Post Steps
Post steps perform a specific function. They allow you to specify what data to send to Syspro using Syspro Business Objects. Setting up Business Objects and communication to Syspro is described separately in the Syspro Communication section of the on-line help.
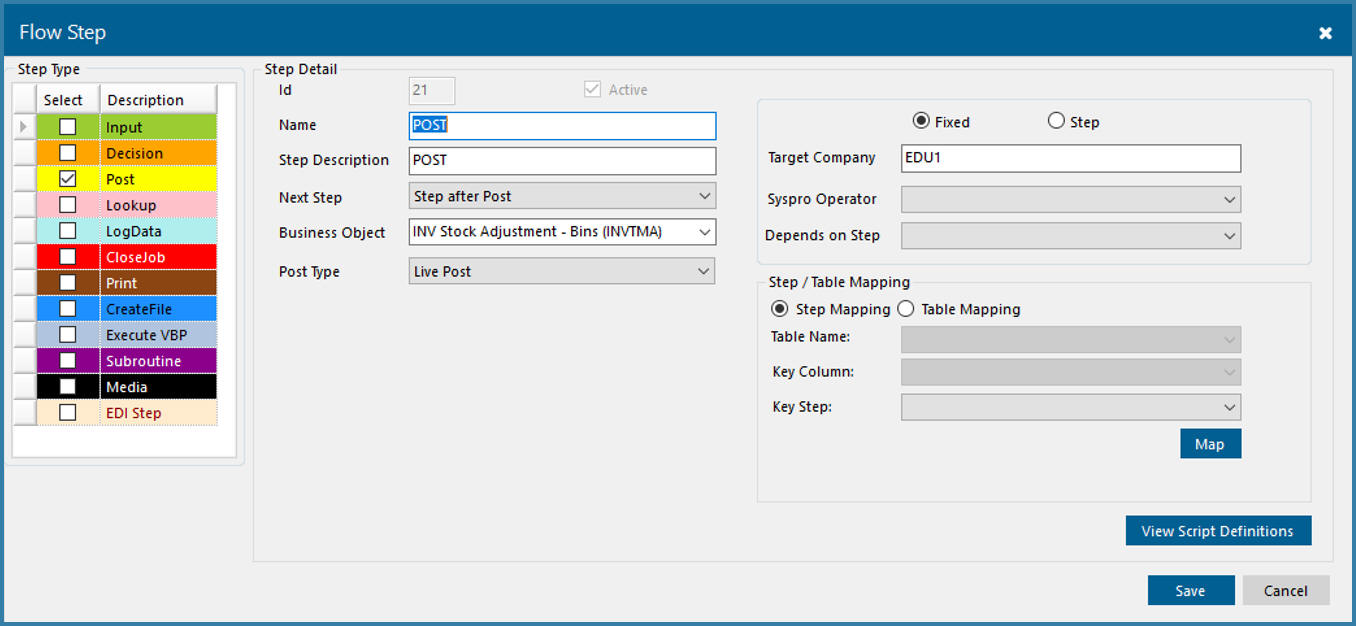
If the user selects a step type of Post, the form shown below appears.

Post Step Definition
The fields are described below:
Name - reference used when building the step and defining the step sequence. For example PostAdjustment
Step Description - Since there is no user interface on this step type this can be the same as the step name
Business Object - This is the name of the business object call that will be made to Syspro.
Post Type - There are various ways in which data can be posted which are covered in the Posting Types page
Target Company - By default TransLution will always post to the Syspro Company defined as part of company setup in EazySetup. It is however possible to select to post to another company. This alternative company for posting can be a fixed value or it can be read from another step making the alternative posting company flexible. If this is left blank, normal posting occurs the the company defined against the current company.
Syspro Operator - It is recommended that pooled operators are used for all posts which means that nothing should be selected here. There are however times when a specific post may for example take a long time and exclude other users. For that type of case it is recommended to use a fixed operator. Setting up pooled and fixed operators is done in EazySetup. If no operator is selected then TransLution will use the first available operator from the pool of operators to do the post. This is the most scalable option and is generally recommended.
Depends on Step - If there are multiple post steps in a function, you may want to be sure that the second post only happens if the first post was successful. This is where you define that dependency. This only works for buffered posting - if a live post fails then the function closes. If there is nothing selected here then if there are multiple post steps in a function, each post will be executed regardless of whether other posts succeeded or failed.
Step Mapping vs Table Mapping
Table Mapping: This is a special case whereby data is read from a table and then posted. It can be used to post data independently of scanning steps but the most likely mechanism is that data will be logged using a log step and then, after multiple rows have been logged, this mechanism can be used to do a single post. The table name defines which table to use as the source data for posting. Only rows in status 5 will be posted. In addition the user needs to select which rows to post based on the filter values defined using the Key Column and Key Step values.
This will allow only rows where the column value matches the step value to be posted. A simple example would be to make sure that all rows for the same Job ID are posted at the same time by using JOB_ID as the key column value. The Job ID is also supplied as a key step option. This means that if multiple people are scanning, when user A clicks on the post button, only rows for his current job are posted rather than rows scanned by other users.
This method is used in conjunction with a LogData step which is used to log scanned data to a database table. In addition to the normal columns required by a LogData Step it is of course necessary to have all the columns that are to be mapped to the business object.
In addition this table needs to have the following columns:
ProcessStatus - which needs to be logged as a status of 5 in order for rows to be posted. Once the post is done, this row is updated to status 15 (failed post) or 20 (successful post).
BUSINESS_OBJECT_EVENT_ID - to log the id of the row in the BOE table where the post results were logged.
BUFFER_POST_DATA_ID - to log the ID of the buffer post table for the post to close the Audit trail loop
Step Mapping: This means posting using the step data just scanned.
Once you click on Save, the step is added to the grid showing all the steps. There is still one thing left to do and that is to define which data gets posted to Syspro. This is done by right clicking on the step to see the form below or by using the 'Map' button shown above.

Configuring Post Data
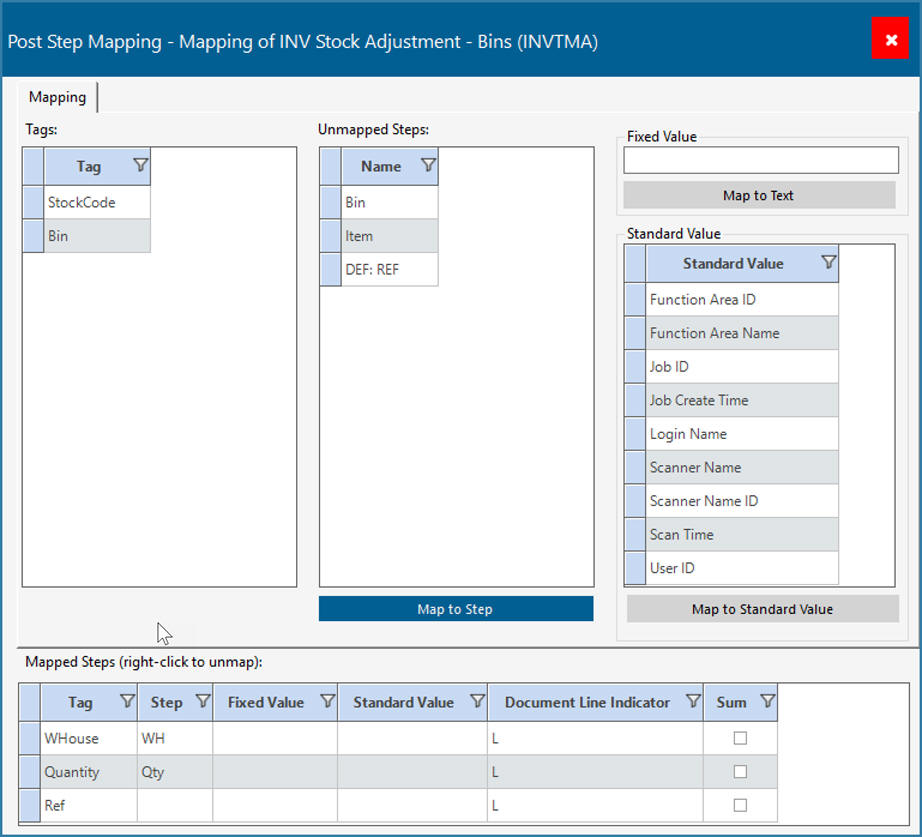
Select the option 'Build XML for POST' to see the form below.

Mapping Tags
The grid on the left shows all the tags in the XML definition for posting that are not yet mapped. The middle grid shows steps that have not been mapped and on the RHS you see the option to map either a fixed value or a list of standard TransLution values. Standard values would for example allow you to map the scanner name or the login name of the current user to pass to Syspro as a reference. It is necessary to select an Unmapped Step, Fixed Value or Standard value to map to a Syspro XML tag. The information will then show as a Mapped Prompt in the lower grid as shown above.
Once all the prompts are mapped, use the red arrow to close the form. Changes are saved automatically.
Please note that the post will happen immediately after the step before the post step has completed. No user intervention is required.