General Grid Configuration
General Girds are built on the Grid Function Area maintenace form. A General Grid differs from a TL Selector Grid in one important way. With a General Grid you are able to look at data in 2 grids from 2 different, but related views. A good example of why you would want to do this is to view documents. For example the top grid can show you a list of sales orders and the lower grid can show you all the lines on a selected order.
Clicking on a function (or selecting to add a new function) will show the main configuration form as below.
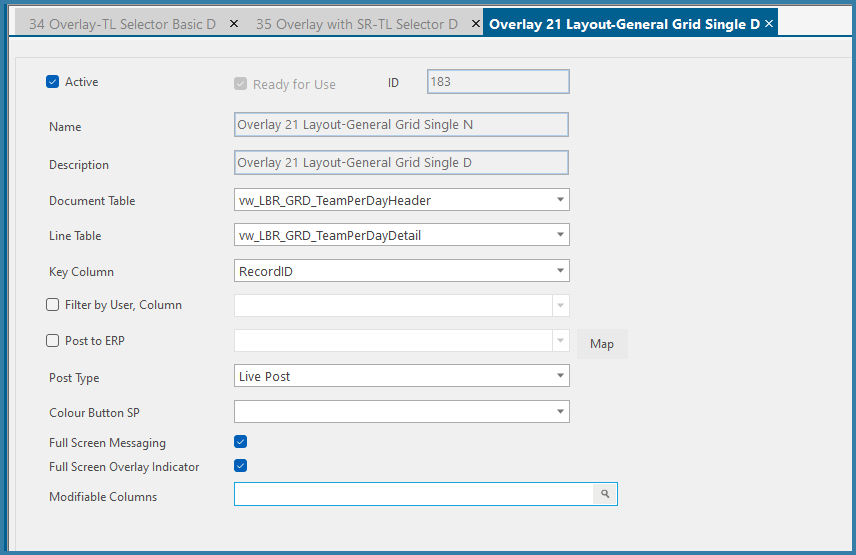
General Grid Definition
The function Name and Description are standard.
The Document Table and Line Table define the names of the SQL views that contain the data to be presented on the grid.
The Key Column is a column that links the two views and must exist in both columns. In our Sales Order example, this could be the Sales Order Number. The lookup will only show columns that exist in both views which helps to prevent errors.
All other fields are the same as those on the TL Selector Grid
Post to ERP, Post Type - It is possible to post data to Syspro with a core TransLution button. It is more common for TransLution to be implemented to use a Subroutine with a Post Step and this option is no longer commonly used even though it is still supported.
- Filter by User - if you want to see data relating only to a specific user, you can include the user name in the view being used and select Filter by User and also define which column contains the username you wish to filter by. This setting will filter the data before it is displayed on the EazyTouch screen.
- Colour Button SP - This is the name of the Stored Procedure that will change the function area button colour red or green. This applies to EazyTouch for Windows only.
- Full Screen Overlay Indicator - If this option is selected, the Overlay is opened without the numeric keypad panel on the RHS giving more space to the grid.
- Full Screen Messaging - When a subroutine is called, this option will show errors on the SR steps as full screen errors rather than standard errors.
- Modifiable Columns - It is possible to allow users to enter data into only certain columns on the grid. This is where you choose which columns users can modify.
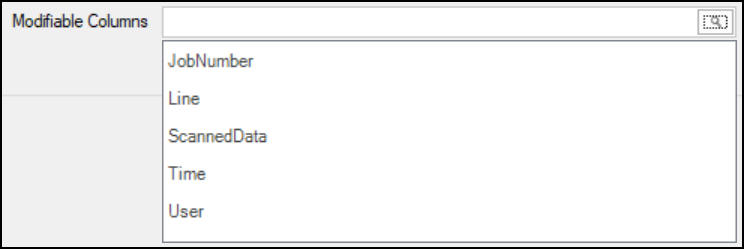
Modifying columns
Below this you will see a sample of the grid and options to define the custom buttons as shown here.
The next step is to define which subroutines you want to call to act on rows on the grid. These subroutines are used to do things like print labels, post data to Syspro or log changes users make to data in the grids.
Clicking on the Button Mapping form allows you to define which Subroutines to call and is covered here

Samoe Grid Data
Table and View Structures
There are some specific columns required in either the table or the view. These are shown below.
Header Table
ID (this columns MUST be present. Without this column the grid refresh will not be able to select the correct line when refreshing)
Document Number or any other column as the Key Value
LineColour - Not required if no line colours will be used.
ProcessStatus - Only rows in status 0 are shown
ProcessDate - not used if no posting is done
Response - not used if no posting is done
BUSINESS_OBJECT_EVENT_ID - not used if no posting is done
Line Table
ID (this column MUST be present. It is required identify selected rows on the grid)
Document or Any other column as the Key Value (must match the column name in the header table)
ProcessStatus - Only rows in status 0 are shown
Line
LineColour - Not required if no line colours will be used. Also if a layout is used, any column can be used for line colour.
ProcessDate - not used if no posting is done
Response - not used if no posting is done
The lines in the either grid can be displayed in various colours. This depends on the line colour column value. If the view or table for the detail grid contains a column called LineColour then this column won't be shown on the grid but it will affect line colour as follows:
0 = white
5 = green
10 = red
15 = yellow
20 = orange
25 = pink